Chapter 2: Filesystem package
Alright! In Chapter 1 you got your content-type and your workflow hooked up and running. You’re now ready for the next step: pushing your changes to a filesystem-based package and into a version control system.
Now, why would you even want to do that? Here’s a couple of reasons:
Tracking of changes
The most obvious one: when you store the configuration of your content-type and your workflow in a VCS, you can track how they changed over time. It’s useful to be able to look back a few months and see how your files changed.
Distribution to other developers
If you are working in a team you have two ways of distributing your work: either write up a guide on what needs to be clicked for someone to come to the state you are currently at (slow, manual and error-prone) OR you export your configuration and the other developer simply imports it (fast, consistent).
Tests
Last, but the most important one, having your configuration exported to a filesystem package allows you to write tests for it. When your test runner spins up a Plone site to run tests against, it needs to have the same content-type and workflow that you configured TTW. And importing configuration is by far the easiest way to give the test runner just that.
Package skeleton
Let’s start by creating a package skeleton. Since writing things up from scratch kinda sucks, use this tutorial as your skeleton.
Exporting configuration
Exporting Todo Item content-type
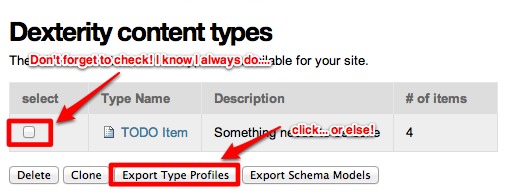
Navigate back to the dexterity content type panel or go directly to http://localhost:8080/Plone/@@dexterity-types
Check the TODO item and then click on export type profile to download the type. If you don’t check anything, it won’t do anything and there is currently no error message so don’t be surprised.
This will start a download to your machine. Navigate to the download directory and unzip the contents of the file that was downloaded. Here is an example of what it will look like:
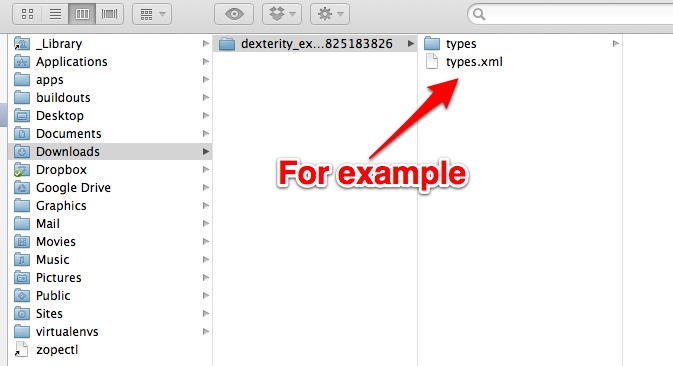
We need to take types.xml and the types folder, and save it in our base product. You can use your finder or explorer to drag and drop, or use the command line. I’ll use command line as an example but feel free to improvise. You want to move the files into your default product profile. What’s a profile? Don’t worry about it. Sit back, relax, and finish the tutorial. You will move the files into
tutorial.todoapp/src/tutorial/todoapp/profiles/default
Warning
There is a bug in Plone 4.3 that makes the import process brake when parsing XMLs that the export tool exports. To make it work we need to remove the comment line from types.xml:
<!---*- extra stuff goes here -*--->
Anytime you perform some sort of configuration export from Plone to a custom product, you will put the XML files in the profiles/default folder. Every time you make changes to your types, you should re-export and save into the same location. Now, when the next person installs the add-on, they wil have the type already there!
Dependencies
Before we continue we need to tell Plone that whenever we install tutorial.todoapp we want it to also pull in the Dexterity package, so our content type is working happily. We do that by adding the following lines to profiles/default/metadata.xml, inside the <metadata> tag.
<dependencies>
  <dependency>profile-plone.app.dexterity:default</dependency>
</dependencies>
Exporting todo_item_workflow
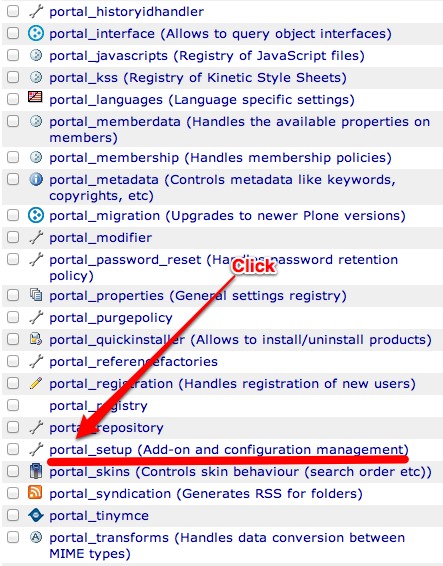
Exporting a workflow is very similar to exporting a Dexterity type. It just takes a little bit more navigating and a trip to the ZMI. To export the workflow, navigate to the root of the ZMI by gong to http://localhost:8080/Plone/manage_main. From there, head into the portal_setup tool:
WARNING: The following User Interface is not recommended for children under 18.
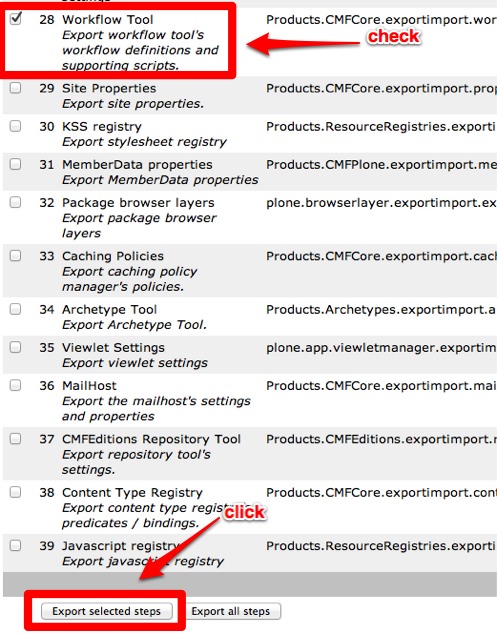
In the portal_setup tool, click on the export tab.
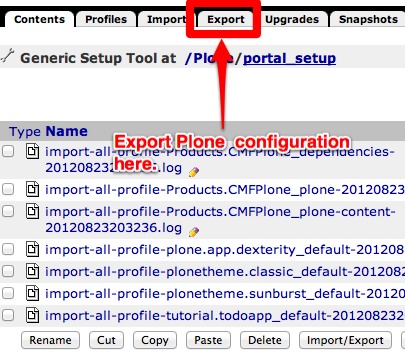
There are a LOT of things that you can export here, but that is for a different tutorial. For now, find export item #27 called Workflow Tool, check the box to the left. Then scroll all the way to the bottom and Export selected steps.
Just like the Dexterity content type, you will want to untar the downloaded folder, and move into your default profile folder.
In that download you should have a file called workflows.xml and a folder called workflows like below. You will move both of them to the default profile.

Place all of these files in your profile at
tutorial.todoapp/src/tutorial/todoapp/profiles/default
Now, this export exported the entire configuration for all workflows in your site. But you are only interested in the todo_item_workflow configuration and you don’t want to change configuration for other workflows. So, first, remove all other workflow definitions (XML files).
rm -rf tutorial.todoapp/src/tutorial/todoapp/profiles/default/workflows/comment_review_workflow
rm -rf tutorial.todoapp/src/tutorial/todoapp/profiles/default/workflows/folder_workflow
rm -rf tutorial.todoapp/src/tutorial/todoapp/profiles/default/workflows/intranet_folder_workflow
rm -rf tutorial.todoapp/src/tutorial/todoapp/profiles/default/workflows/intranet_workflow
rm -rf tutorial.todoapp/src/tutorial/todoapp/profiles/default/workflows/one_state_workflow
rm -rf tutorial.todoapp/src/tutorial/todoapp/profiles/default/workflows/plone_workflow
rm -rf tutorial.todoapp/src/tutorial/todoapp/profiles/default/workflows/simple_publication_workflow
Secondly, remove all non-todoitem-related stuff from workflows.xml. In the end the file should look like this:
<?xml version="1.0"?>
<object name="portal_workflow" meta_type="Plone Workflow Tool">
 <object name="todo_item_workflow" meta_type="Workflow"/>
 <bindings>
  <type type_id="todo_item">
   <bound-workflow workflow_id="todo_item_workflow"/>
  </type>
 </bindings>
</object>
And you are done! Congratulations on the birth of your new product!
Tests
Alright, tests! Considered a pain and a nuisance by some but loved by all who do it. If you want your code to be solid and your site to be stable, tests are a great way to get there.
The package you have on your filesystem is already configured to give you a test-runner so you can immediately go and run it – obviously you have no tests, but at least you try if your test runner works.
tutorial.todoapp$ make tests
Total: 0 tests, 0 failures, 0 errors in 0.000 seconds.
Note: you do NOT need to stop your Plone instance in order to run tests. They will peacefully co-exist.
Good, the next thing to do is to add tests. Go to tutorial.todoapp repo on GitHub and copy/paste (or download) all files from the src/tutorial/todoapp/tests folder to your local src/tutorial/todoapp/tests folder. You can also get the tests with git:
$ git branch --track chapter2 origin/chapter2  # tell git what chapter2 is
$ git checkout chapter2 src/tutorial/todoapp/tests  # get tests
This folder will contain your test files:
test_setup.py
This module contains tests that check if your package was successfully installed and configured. Tests in here are concerned with XML files you have in the profiles/default folder.
test_todo_item.py
And finally a module that contains tests for your custom content-type.
We will not go into details of what each test does as we believe the test code and its comments are in themselves informative and we will rather encourage you to go through all tests, try to understand what they do, maybe change something and see what happens, etc.
Remember that you run tests with make tests and you should get an output that looks somewhat like this:
tutorial.todoapp$ make tests
[...snip...]
Set up tutorial.todoapp.tests.base.TodoAppLayer:Integration in 0.000 seconds.
Running:

Ran 11 tests with 0 failures and 0 errors in 9.782 seconds.
Tearing down left over layers:
Tear down tutorial.todoapp.tests.base.TodoAppLayer:Integration in 0.000 seconds.
Tear down tutorial.todoapp.tests.base.TodoAppLayer in 0.004 seconds.
Tear down plone.app.testing.layers.PloneFixture in 0.164 seconds.
Tear down plone.testing.z2.Startup in 0.012 seconds.
Tear down plone.testing.zca.LayerCleanup in 0.004 seconds.
Also, remember that whenever you run make your tests are gonna be run too.
Troubleshooting
If something goes wrong you can always go to GitHub and see how the code for chapter 2 should look like and compare this to what you have on your local machine.